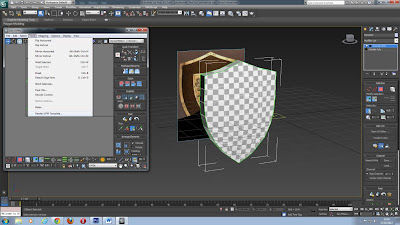
Shield:
Open image in PhotoShop- Work with image which is symmetrical
Look up size of image
Take height and divide by 300
Times number by 48
Go to front wireframe view and enlarge the screen
Create a plane length 60 and width 48
Right click Wireframe word in the top left of the box and
select shaded
Press G key to get rid of grid
Press M to open material editor and select modes – Compact-
go to Maps- diffuse colour- none- bitmap- open image
Move image back
Right click front shaded window (actual image) and select
object properties- Tick freeze and untick Shaded grey
Enlarge view- create another plane- same size- right click-
object properties- check see-through
Convert-
editable poly- vertex mode
Create a selection over a line of dots (vertical) and use
the scale tool to shape them to the shield
Use move tool with vectors
Go to the other view, which shows all 4 screens and go to Border
mode (right hand menu- modify)- click on an edge and use the shift button and
the move tool- pull the Y axis backwards to give the shield some depth (Press
F4 to show lines)
Object Properties-
uncheck See-through
Uncheck the plus sign for editable poly- modify list- FFD (Free
form defamation 4 x 4 x 4)
Go to plus (right hand menu) for FFD 4x4x4 and select
control points- draw a selection and shape accordingly (in this case pull the 4
middle points outwards to create curve to the shield)
When happy convert to editable poly
Unwrap UVW- open UV editor
Select red cube (poly mode) in UV editor
Press Ctrl and select the individual polys for the front of
the shield, Press shift and select a poly to unselect it
Mapping- Flatten mapping (gives view of the shield in UV editor)
Ctrl and I to invert selection- Mapping- Unfold mapping
Load in PhotoShop- drag the shield picture onto the shield
template and match up the grid
Ctrl and J to copy background layer and place at the top
Fill in white a new layer and put it underneath the shield
reference image
Put a wood texture picture onto the long strip (which
surrounds the shield)
Ensure that the grid on the top layer is turned off before applying the texture in Max by clicking the eye icon
Go Back into Max and press M to open material editor- Map-
diffuse colour- bitmap- open photoshop template and drag the material onto the
shield, then press the checkered button with the light bulb to see the texture
To smooth the shape: Right click- convert to editable poly-
drop down list for editable poly- select Polygon
Ctrl and A to select all of the shield- Modify- Go down to
‘Polygon: Smoothing Groups’ and select Auto Smooth
When you press the teapot to render the shield the edges
should appear to be smoothed
Click the drop down arrow (right hand menu) and go to
Flatten image
Shield Spec:
Press Ctrl + Shift + N to create a new layer on top (as a
back-up)
On the new layer (one just created) Go to image-
Adjustments- De-saturate to make it black and white
Image- Adjustments- Levels- adjust the levels so that the
highlights stand out (where the light is reflecting show up really well)
Image- Adjustments- Brightness/contrast- adjust the contrast
to make the wood dark and the metal bright
Bump Map:
Press Ctrl + Shift + N to create a new layer on top
On the new layer (one just created) Go to image-
Adjustments- De-saturate to make it black and white
Image- Adjustments- Brightness/contrast- adjust the contrast
to make the middle part of the shield stand out
Shield Spec Colour:
Press Ctrl + Shift + N to create a new layer
On the new layer (one just created) go to image-
Adjustments- De-saturate to make it black and white
Press Ctrl + J to copy the background layer and move it to
the top
On the top layer (background copy) select colour from the
drop down menu (menu to the right)
In Max- Press M to bring up material editor- open the
material which you already have on the shield
Go to Maps- check specular colour- Press none- select the
photoshop file called Shield Spec colour (it should be a gold tinted shield
Check Specular Level- Press none- select the Photoshop file
called Shield Spec (it should have very dark coloured wood)
Check Bump- Press none- select the Photoshop file called
Bump Map (it should have a black and white lighter coloured shield)
Before After


No comments:
Post a Comment